Discussion about coding and coding tools as it relates to being indie developers.
- ButtonNode with enable
This is a follow-up to my previous ButtonNode post. In this update I will be adding additional functionality to the button to allow the button to be enabled and disabled.
For this new functionality I want the ButtonNode to be able to do the following:
- Maintain a boolean value indicating the current state of the button
- Prevent the button from being clicked when it is disabled
- Update the look of the button so that it appears to be disabled
- Allow the button to toggled between the enabled and disabled state
To start we will simply add a new public property that represents the enable state of the button
@property (assign, nonatomic) BOOL enable;Defining this property will automatically synthesize the getter and setter methods. But, since we want to change how the button looks and behaves when it is disabled we need to be able to execute code whenever the buttons’s enable property is set. The simplest way to do this is to create our own setter method which will be used instead of the auto-synthised setter.
// Setter for the enable property. Update the button based on the new state
– (void)setEnable:(BOOL)enable {if (enable) {
self.userInteractionEnabled = YES;
self.alpha = 1.0;} else {
self.userInteractionEnabled = NO;
self.alpha = 0.5;}
_enable = enable;}
In the setter method, when the button is being disabled, we set the userInteractionEnabled to NO and apply an alpha of 0.5 to dim the button. When the button is enable we simply reset the alpha to 1 and re-enable user interaction. Finally we update the underlying _enabled variable to track the state of the button.
The ButtonNode sample app, available on our github (ButtonNode) page, has been updated with this new functionality.
You can find me on twitter @mellowcoder
Continue reading → - 2015 Holiday Game Jam
What better gift can one receive than the experience and exhaustion that comes from a Game Jam. As if the holidays weren’t stressful enough with family, old friends, traditions, travel, of of course that last min party preparation. With less than 3 days to jam out a game before christmas eve, despite the warm weather in the northeast, we had a snow covered mountain to climb. We elected to use Unreal Engine 4, not because we were familiar but instead the opposite. Our goal was to gain as much knowledge as quickly as possible while still producing “a game”(using a loose definition).
Our goal: make a top down constant scrolling shooter e.g. Capcom’s “1942” and sequel “1943:Battle of Midway” targeted for portrait mode on mobile devices. At the end of the first day we laid out an outline; in retrospect our goals were pretty ambitions for 2 unreal 4 noobies.
First focusing on the good, I’m going to list some of the things we managed to achieve. In game flat textured models for both the hero ship and enemy towers. Projectiles that fire from the enemy towers. A scrolling level that constantly deletes passed sections while adding new sections.
We also had player death on collision with obstacles or projectiles, adding in explosions and sound effects using unreal mobile starter content. In addition the starter content also provided us with an obstacle mesh, as a rock, and textures for the environment.
In conclusion there was a lot more we wanted to accomplish; player shooting, life gauge, collectables, points, more animation, HUD with points, and some menus. It was a fun challenge to see what we could make with an unfamiliar tool. It was a success to help us learn Unreal Engine 4 and the Blueprint visual scripting language.
Continue reading → - Preroll Video iAd’s as Reward Incentive
A common Freemium model for mobile games is to offer a reward (currency, bonuses, etc) in exchange for watching a fullscreen video ad. Attempting to recreate this model using video preroll iAds is possible but has some less than ideal complications. I’ll be going over the basic implementation and the things I wish were different. I started with the Game Health Indicator sample and adjusted it so when the health bar is empty you have to watch an ad to refill it.
First add the iAd.framework to your project under project->Target->General tab. Next we’ll notify our app to prepare and download preroll ads.
AppDelegate.m
@import iAd;@implementation AppDelegate– (BOOL)application:(UIApplication *)application didFinishLaunchingWithOptions:(NSDictionary *)launchOptions {
//Tell app to download a preroll ad from the iAd server so it is prepared to play
[AVPlayerViewController preparePrerollAds];
return YES;}
This is a necessary class method to call to but also the source of our first complication. I have yet to find a way to query if a preroll Ad has been downloaded or if one is available. As opposed to the AdBanner class that provides the very convenient bannerLoaded read only property. Then we’ll set up our AVViewController inside our viewController presenting the video ad.
GameViewController.m
//AVPlayerViewController and AVPlayer
@import AVFoundation;
@import iAd;@interface GameViewController()
//preroll iAd properties and controller
@property (nonatomic, strong) AVPlayerViewController *prerollAdPlayer;
@end– (void)viewDidLoad
{
…//set up the ViewController
self.prerollAdPlayer = [[AVPlayerViewController alloc] init];
//self.prerollAdPlayer.showsPlaybackControls = NO;}
Here is our second complication. Unlike the typical ad which just requires a tap to follow an external link, video preroll iAd’s require the user to tap the i:information button in the bottom left corner of the AVViewController’s playback controls. This is frustrating on several levels; first we can’t hide the playback controls and second the user is in no way required to watch the entire ad. They can simply skip to the end or hit done. We also have no way to know if they watched the entire ad or not. Continuing from here well set up a method to present and dismiss our video ad once it’s finished playing.
GameViewController.m
//method to play our video ad
– (void) playVideoAd{//present our ad AVViewController
[self presentViewController:self.prerollAdPlayer animated:YES completion:^{
//Play the preroll ad
[self.prerollAdPlayer playPrerollAdWithCompletionHandler:^(NSError *error) {if (error) {
//most likely error is we just didn’t have an ad to play
NSLog(@”%@”,error);}
else {//The ad started to play and didn’t encounter an error so we give them their reward
[self refillReserves];
self.completeAdPlayback = true;}
//now we just have to dismiss our AVViewController to return to the game error or not.
[self.prerollAdPlayer dismissViewControllerAnimated:YES completion:^{if (error) {
//if the ad was unable to play we alert the user
[self showAdPlayerErrorAlert];}
}];
}];
}];
}
Finally for iOS 9 we have to add one more thing to our Info.plist.
Info.plist
App Transport Security Settings
Allow Arbitrary Loads YES
This is the last complication. For iOS 9 apple added a new security feature called App Transport Security (ATS). Which basically restricts your app from talking to any non HTTPS servers. For whatever reason iAd’s preroll test Developer Ad’s don’t come through an HTTPS server. There is a good chance that this isn’t true for live preroll ad’s but at this time I can’t provided a definitive answer about that.
A sample ap can be found at Preroll-iAd.
You can download Fillip’s Feast from the Apple Ap Store.
Don’t forget to follow me on Twitter @Maroonfacelift.
Continue reading → - ButtonNode
When we first started developing with SpritKit we quickly felt the need for some higher level abstractions. One example of this is a button. As a result we ended up creating a simple ButtonNode class that we could use throughout our game. This post will present an example of our button node extracted from our Fillip’s Feast game, available in the Apple App Store.
The following features are included in this basic button node implementation.
- Buttons would use images from textures or named image assets
- Provide visual feedback when button is selected
The ButtonNode subclassed SKSpriteNode and provides 2 contractor methods.
+(instancetype)buttonWithImageNamed:(NSString*)image forTarget:(id)target andSelector:(SEL)selector;
+(instancetype)buttonWithTexture:(SKTexture*)texture forTarget:(id)target andSelector:(SEL)selector;The implementation of each of these only varies based on the source of the image to be used for the button. Here is what we have for the creating the button with a named image.
// Allocates and initializes a new button node from a named image
+(instancetype)buttonWithImageNamed:(NSString*)image forTarget:(id)target andSelector:(SEL)selector {ButtonNode *button = [[ButtonNode alloc] initWithImageNamed:image forTarget:(id)target andSelector:selector];
return button;}
// Init button with a named image
-(instancetype)initWithImageNamed:(NSString*)image forTarget:(id)target andSelector:(SEL)selector {if (self = [super initWithImageNamed:image]) {
self.target = target;
self.selector = selector;
self.userInteractionEnabled = true;
self.color = [SKColor grayColor];}
return self;}
With this constructor we can now create our new button node and add it to our scene. Since this is a subclass of SKSpriteNode you use the normal SKNode position property to set the location of the button within the scene.
-(void)addMyButton {
ButtonNode *myButton = [ButtonNode buttonWithImageNamed:@”myButtonImage” forTarget:self andSelector:@selector(myButtonAction)];
myButton.position = CGPointMake(CGRectGetMidX(self.frame), CGRectGetMidY(self.frame));
[self addChild:myButton];}
Notice in the method above we are setting the target to self (our current scene) and the selector (the method that will be called) as myButtonAction. In the scene you then need to add the myButtonAction method with the appropriate code to be executed when the button has been pressed and released.
So now we have to address what happens when the button is touched. There are a few different scenarios we have to deal with. First what happens when the button is touched, then what happens when the user touches the button but then drags out of the button area, and then finally what happens if the user is within the button area and lifts their finger off the button. The final case is what is commonly referred to a “touch up inside event”. Lets go through the code for each of these.
First what happens when the user touches the button. In this case we want to give the user a visual indication that they are touching the button. For this we will respond to the “touches begin” event. Here we are responding to this event and if the touch happens to be inside our button we will set the button to the selected state.
// When the button is touched blend the button color with the image to give it a selected appearance
– (void)touchesBegan:(NSSet *)touches withEvent:(UIEvent *)event {UITouch *touch = [touches anyObject];
CGPoint touchPoint = [touch locationInNode:self.parent];
if (touches.count == 1 && CGRectContainsPoint(self.frame, touchPoint)) {[self setSelectedState:YES];
}
}
Setting the button to the selected state will simply update the color blend factor so the buttons appearance changes.
// Helper method to set or unset the button selected state
– (void)setSelectedState:(BOOL)selected {if (selected) {
self.isSelected = YES;
self.colorBlendFactor = 0.7;} else {
self.isSelected = NO;
self.colorBlendFactor = 0.0;}
}
So what happens if the user has touched the button but then drags their finger off of the button. In this case we want to change the state of the button to be not selected. But, we also need to handle the case of the user then dragging their finger back within the area of the button. To handle both of these cases we need to handle the touches moved event.
– (void)touchesMoved:(NSSet *)touches withEvent:(UIEvent *)event {
UITouch *touch = [touches anyObject];
CGPoint touchPoint = [touch locationInNode:self.parent];
if (CGRectContainsPoint(self.frame, touchPoint)) {[self setSelectedState:YES];
} else {
[self setSelectedState:NO];
}
}
So when in the touches is moved we are checking to see if the touch is inside or outside of our button and setting the Selected state as appropriate.
Finally we need to handle the case where the user has touched the button and then releases it. For this we need to respond to the touches ended event. If the button selected state is true we will call the activateButton method,
– (void)touchesEnded:(NSSet *)touches withEvent:(UIEvent *)event {
if (self.isSelected) {
[self setSelectedState:NO];
[self activateButton];}
}
Then finally we need to respond to the activateButton method. In this case we are going to simply call the selector on the target that was passed in when the button was created.
// When activated the button will selector on the target to invode the buttons action
– (void)activateButton{if (self.target != nil && [self.target respondsToSelector:self.selector]){
[self.target performSelectorOnMainThread:(self.selector) withObject:self waitUntilDone:NO];
}
}
In future posts we will expand on the button node class adding additional functionality.
A sample app, ButtonNode , with this ButtonNode class can be found on our github page.
You can find me on twitter @mellowcoder
Continue reading → - SpriteKit and iOS9
This is a short post discussing a few issues that we encountered with updating our SpritKit based game, Fillips Feast, to work with iOS 9.
For the most part everything just worked when running Fillip’s Feast on iOS 9. But, we did encounter a few issues.
One of the first things we noticed was that our intro video was not being shown when running under iOS 9. The video which played fine under prior OS versions was not visible in iOS 9. But, it was playing so it was not an issue of the video. For game loading intro we created a loading scene that is presented when the app first starts. This includes a splash screen, which is an SKSpritNode that displays the first frame of the video and an SKVideoNode used to play the intro video. We also add a message to the intro view once all the assets have finished loading to let the user know that they can tap the screen to skip the rest of the video.
After a bit of debugging we determined that the issues was related to the zPosition of the video. In building the intro scene we had not explicitly set the zPosition for the elements. Simply adding the video node to the scene after adding the splash screen sprite node had been working fine. Explicitly setting the zPosition for the video node, now allowed the video to be shown in iOS 9. But, this had an undesirable side effect in iOS 8 and prior. Now the video was displaying a black screen that flashed before the video started playing. The solution to this was to test for the availability of an iOS 9 feature and only set the zPosition on iOS 9. To do this we simply tested to see that [SKCameraNode class] returned true before setting the zPostion. We also found a few other places in the app where the zPosition needed to be set.
At this point things were looking good, except on iOS 9 the intro video was not playing smoothly. It would play about a third of the way though, freeze, then jump forward and play the final third of the video. This was not an issue on devices that where running an older version of iOS. This problem was isolated to the SKLabelNode we where adding at the bottom of the page to let the user know that could “tap to continue” and skip the rest of the video. We had actually had similar performance issue trying to use an SKLableNode to display the score you are awarded when you catch a bug. The fix for this was to swap out the label node for an SKSpritNode with an image for the text message. The downside of this is it makes it impractical to internationalize this text.
Fillip’s Feast Intro Video
Continue reading → - Game Health Indicator
This post is going to present a simple solution for building a dynamic health indicator for your game. This is based on the health indicator we included in our Fillip’s Feast game, available in the Apple App Store.
The following are the features we wanted for our health meter.
- Follow the overall look of the game
- Provide level indicator based on size
- Provide visual color indication of health
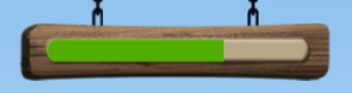
Step one was to create a sprite in which to display the health level. For our game the health indicator shows as a bar within a wooden sign.

Next we need to create a sprite that can be scaled to represent the players health level and who’s color can be adjusted to give an additional visual indication of level. This is done by creating sprite node with a color and size. The initial color does not matter since we will be setting the color based on the players health level. The width is set to match the length of the level indicator in our banner. For our banner this is .875 of the full banner width.
// For the reserve indicator create a white sprite node the same size as the health banner
CGSize reserveSize = healthBanner.size;
reserveSize.width = reserveSize.width * 0.875;
self.reserveIndicator = [SKSpriteNode spriteNodeWithColor:[UIColor whiteColor] size:reserveSize];// Set the anchor point for the indicator to be the left side for horizontal and center for vertical
self.reserveIndicator.anchorPoint = CGPointMake(0.0,0.5);// Posistion the indicator so the left side lines up with the indicator area in the banner
self.reserveIndicator.position = CGPointMake(-reserveSize.width/2,0);
The final setup step requires the creation of a SKCropNode and mask so that health indicator fits within the appropriate portion of the banner window. For this we use another sprite image.

// We will use a crop node to mask out health indicator so it only shows up in the healt bar area of the banner
SKCropNode *reserveCropNode = [[SKCropNode alloc]init];
reserveCropNode.maskNode = [SKSpriteNode spriteNodeWithTexture:[health textureNamed:@”HealthBar_Mask”]];// Add the health level indicator as a child of the crop node
[reserveCropNode addChild:self.reserveIndicator];
The final piece is to add a method that will be called to update the health meter whenever the players health level changes. When the player has full heath the meter will be green. When he is almost out of health it will be red and the length of the indicator will scale accordingly.
– (void)updateReserveDisplay:(NSInteger)reserve {
self.reserveIndicator.color = [SKColor colorWithRed:((100.0-reserve)/100.0) green:(reserve/100.0) blue:0.0 alpha:1.0];
[self.reserveIndicator setXScale:(reserve/100.0)];
}Here is how the banner looks with about 70% health.
A copy of a sample app, health_level_indicator, that puts all of this together can be found on our github page.
You can find me on twitter @mellowcoder
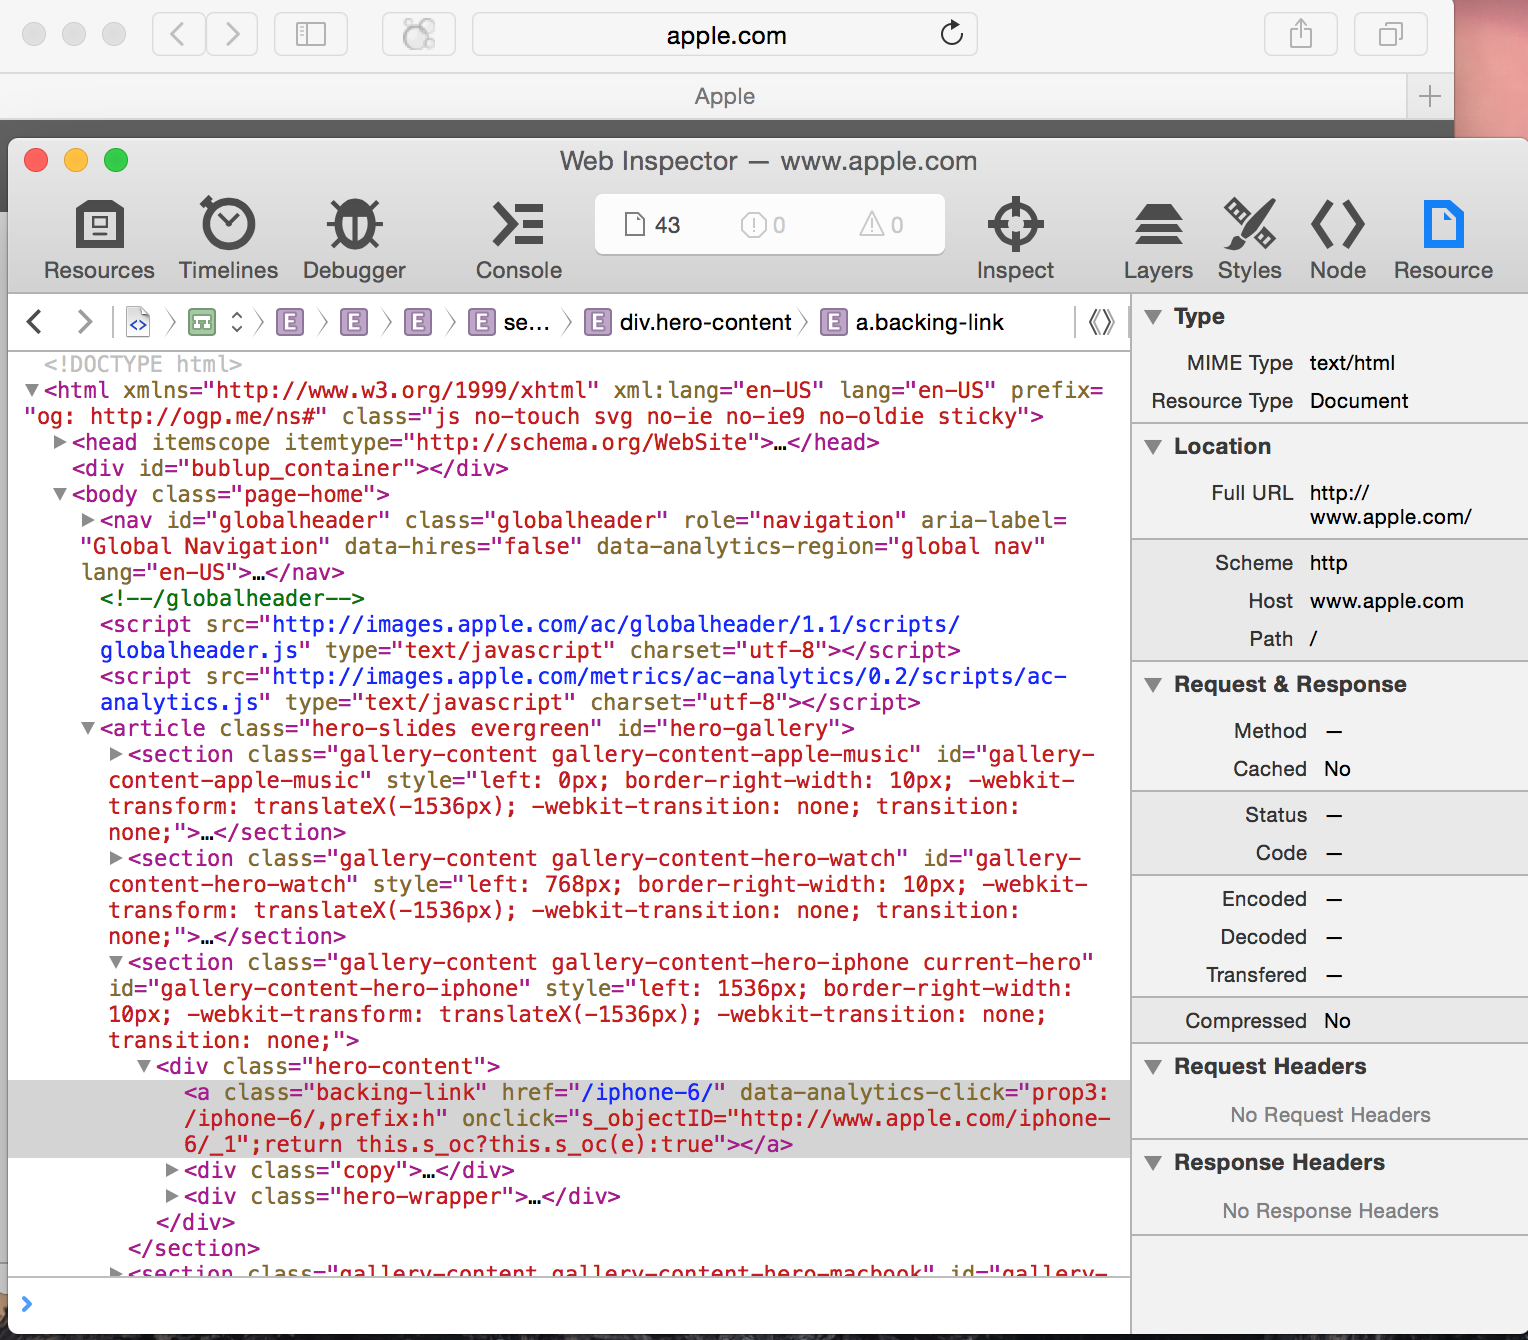
Continue reading → - Web Inspector for iOS Development
If you have done any web related development you are probably aware of the Web Inspector that is available in Safari on your desktop system. If not, here is how to enable this feature.
First you need to enable development mode in Safari. To do this go to Preferences and select the Advanced Tab. At the bottom of the Advanced page will be a checkbox to Enable the Develop Menu.
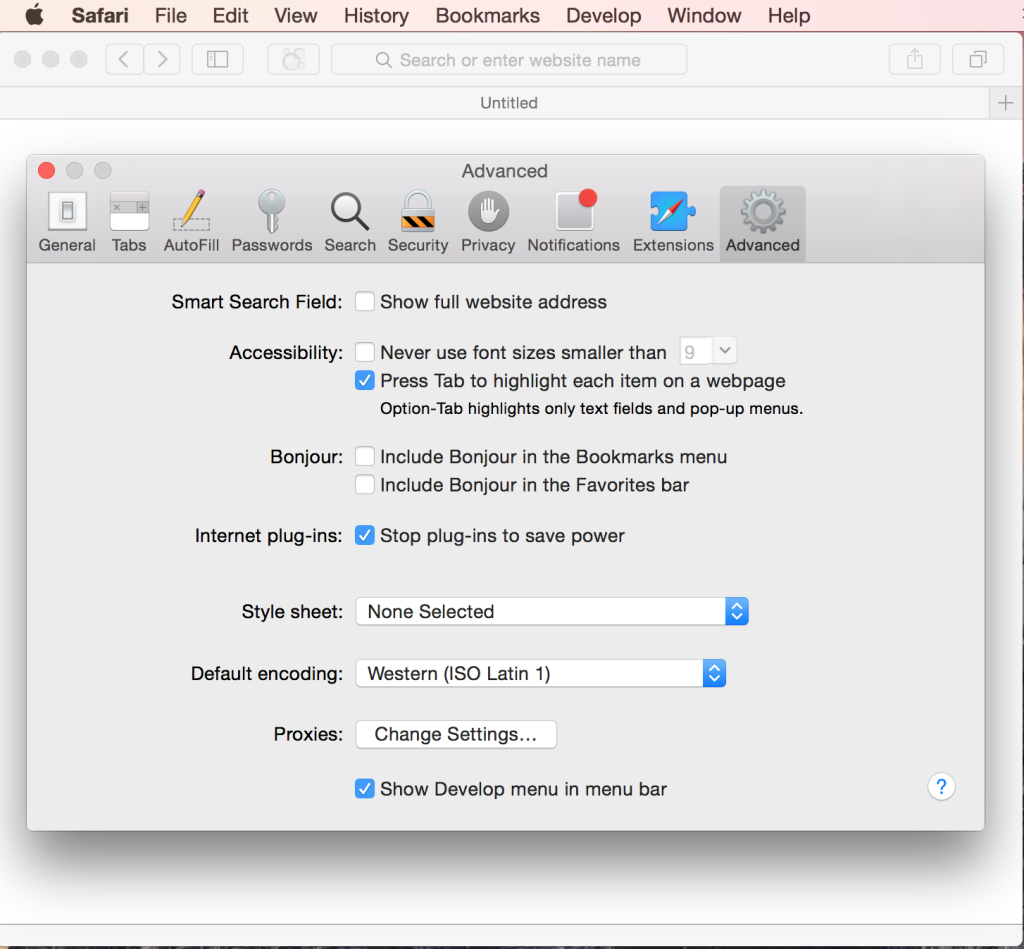
After enabling this option you will be able to bring up the web inspector for any web page shown in Safari. The inspector provides many tools prototyping, optimizing, and debugging web content. Take a look at Apples Safari Web Inspector Guide for details on this tool.

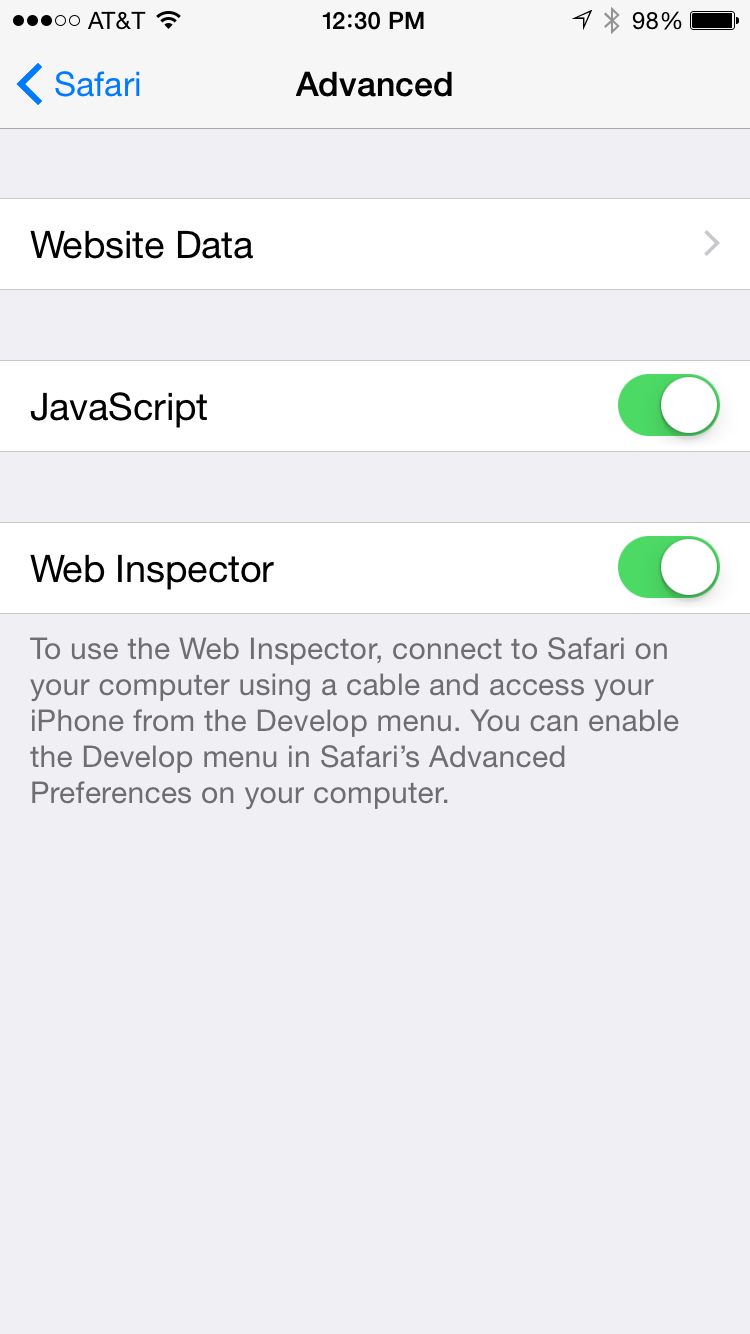
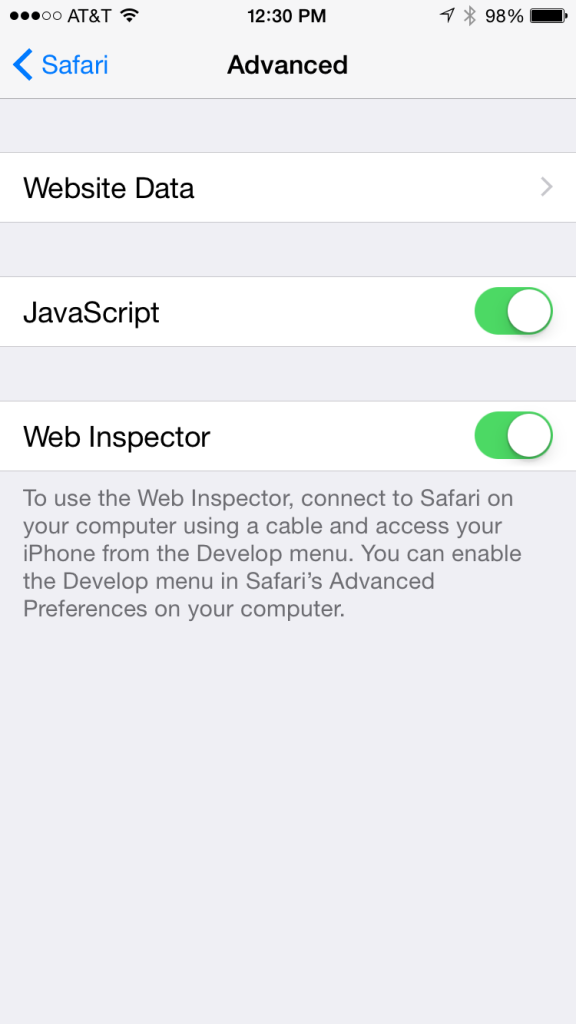
But, did you also realize you can use the web inspector with your mobile device. To enable this on Mobile open the settings app and go to the Safari Settings and select the Advanced Option. There you will see an option to enable the Web Inspector
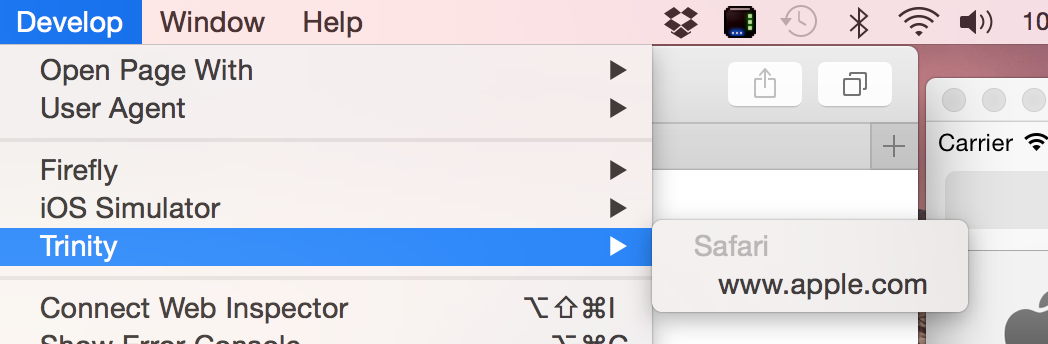
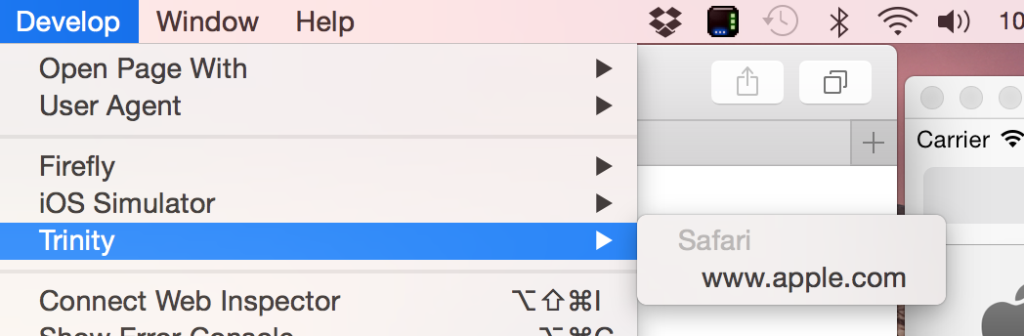
As the note in the preference screen says, connect your iOS device to your computer bring up safari on both the mobile device and desktop. Then on the desktop, under the Develop menu, in the second section you will see the different devices for which you can launch the web inspector. This will work for both tethered mobile devices as well as the iOS simulator.
If you are developing an app that uses a web view you can also use the Web Inspector with that app.
Continue reading → - Working with Images in SpriteKit – Texture Atlas
By: Mark Johnson @mellowcoder
What is a Texture Atlas
A Texture Atlas is simply a large image file that is created by combining together multiple individual images. This can save memory and allows iOS to more efficiently render the textures in your application. The nice thing about SpriteKit is that Apple takes care of building the texture atlas for you. All you need to do is add the individual image files and the textures will be generated when your app is built.
The following is an excerpt from the SpriteKit Guide on when to use Texture Atlases
When you create a texture atlas, you want to strike a balance between collecting too many textures or too few. If you use too few images, Sprite Kit may still need many drawing passes to render a frame. If you include too many images, then large amounts of texture data may need to be loaded into memory at once. Because Xcode builds the atlases for you, you can switch between different atlas configurations with relative ease. So experiment with different configurations of your texture atlases and choose the combination that gives you the best performance.
Starting Point
As in my previous posts on working with images in SpriteKit, I am going to start off with a new App generated with the SpriteKit template. After creating the new App, I deleted the boilerplate touchesBegan method as well as the code in the initWithSize method that adds the label.
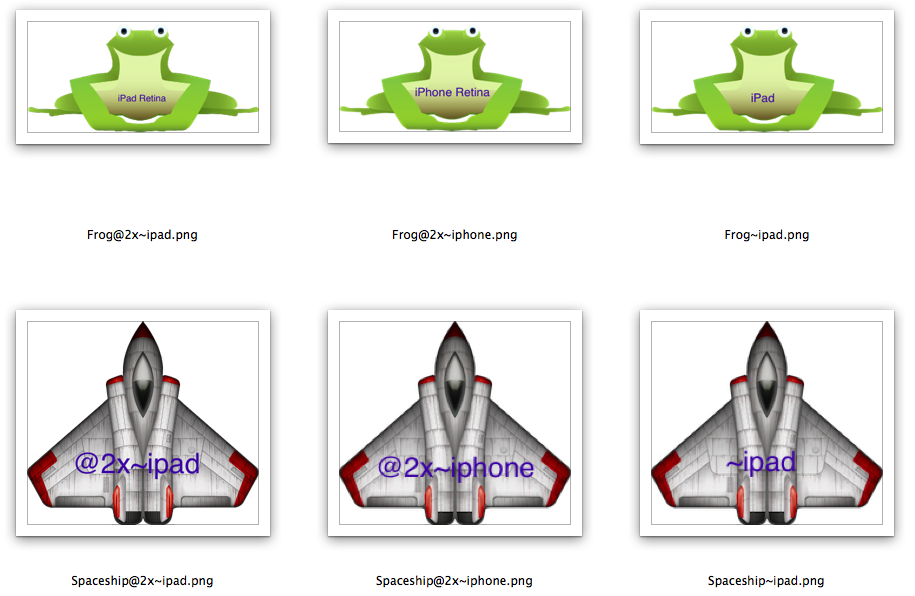
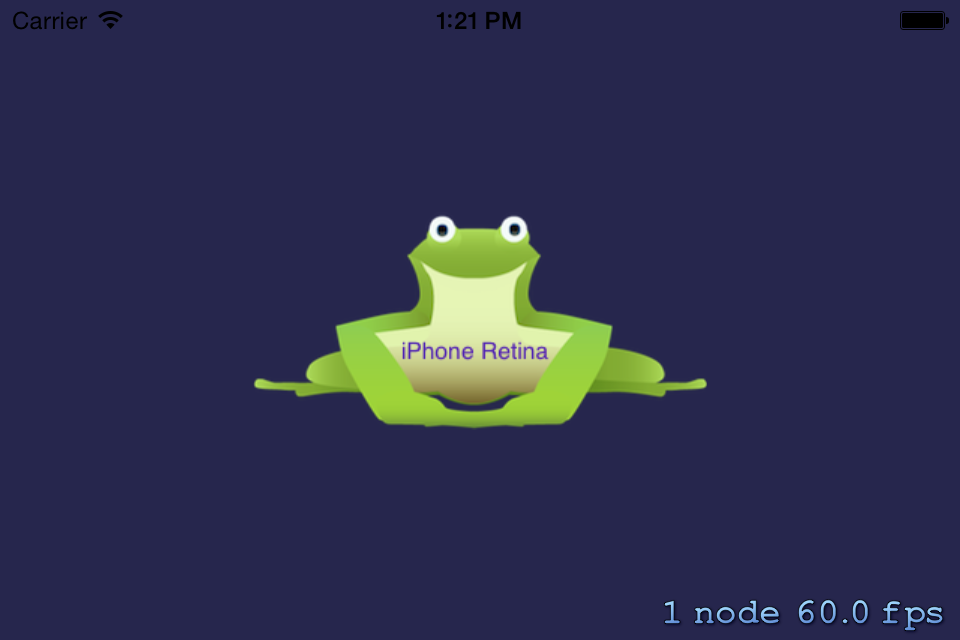
For this test app I have a couple of different images (a frog and a spaceship) in three different sizes. I have also added a label on each of the images so I am sure which image is actually being rendered in each of the different simulators.
Adding a Texture Atlas
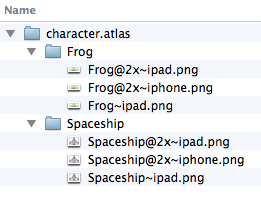
All you need to do to create a texture atlas is create a folder in your project with “.atlas” at the end of the name. You can manually create this folder within the project or you can create the folder in the finder with all your images organized within it and then add the folder to your project. For this app I setup my folder in the finder. Within the .atlas folder you can use subfolders to organize your files. The following screenshot shows the folder I have setup for this example.
Once you have added the atlas to your project you will then add/remove images as needed from the finder. Changes to the content of the atlas are not handled within the project editor.
Using a Texture Atlas in SpriteKit
To use images from the atlas in your project you first need to instantiate the atlas. For example the following initializes the character atlas and then loads the individual images into sprite nodes.
SKTextureAtlas *character = [SKTextureAtlas atlasNamed:@”character”];
SKSpriteNode *frog = [SKSpriteNode spriteNodeWithTexture:[character textureNamed:@”Frog”]];
frog.anchorPoint = CGPointMake(0.5,0.0);
frog.position = CGPointMake(CGRectGetMidX(self.frame), self.frame.size.height*0.25);
[self addChild:frog];SKSpriteNode *ship = [SKSpriteNode spriteNodeWithTexture:[character textureNamed:@”Spaceship”]];
ship.anchorPoint = CGPointMake(0.5,1.0);
ship.position = CGPointMake(CGRectGetMidX(self.frame), self.frame.size.height*0.75);
[self addChild:ship];
Supporting multiple devices
As you may have noticed in the file list above I have used the standard naming convention to differentiate the images for each device. When you build your project it will create a texture map for each device based on the file naming convention. You can see this by locating the built application in finder. If you select the product in the Navigator in Xcode you can find the location of the actual files.

If you then navigate to this location in the finder you can select the actual built app, right click and select the “Show Package Contents” option.

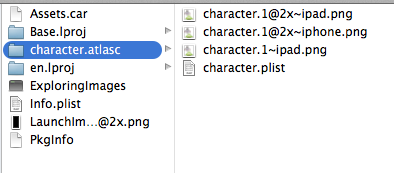
Then selecting the “character.atlasc” folder will show you the actual texture atlases for each of the devices along with the .plist file that is used to mange the files as well as the individual images. The “.1” on the files is a sequence number. If the texture atlas gets too large Xcode will break the atlas into multiple files. If this happens you would see a “.2” or more versions of the texture atlas.
Bug Related to iPad specific Texture Atlas
There is one caveat to this. Even though the “character.1~ipad.png” file is created and it is correctly represented in the “character.plist” when running the app on the non-retina iPad, simulator or device, it always uses a auto scaled down version of the retina images. I have entered a bug report with Apple for this and will update this post when I get an update on this issue.
Continue reading → - Working with Images in SpriteKit – Image Sets
By: Mark Johnson @mellowcoder
Asset Catalog – Image Sets
This is the second in a series of posts on working with images in SpriteKit. In this post we will look at using Images Sets. Asset Catalogs and Image Sets were introduced in Xcocde 5. If you start a new app in Xcode 5 the App Icon and Launch Images are automatically setup in the Asset Catalog. In this post we will look at adding a new image to the Asset Catalog for use in SpriteKit.
To illustrate this I am going to create a new universal app using the SpriteKit template. After creating the new App I first deleted the boilerplate touchesBegan method as well as the code in the initWithSize method that adds the label. In the init method I added the following code to load a test image named “Frog” and have it centered on the screen.
SKSpriteNode *sprite = [SKSpriteNode spriteNodeWithImageNamed:@”Frog”];
sprite.position = CGPointMake(CGRectGetMidX(self.frame), CGRectGetMidY(self.frame));
[self addChild:sprite];
For the image I am using three different sizes of one of the Frog images from our Fillip Frog game. To make it clear which image is actually being used I have added a text label on the image for testing purposes.
- fillip-ipad-retina.png – 654 x 312
- fillip-ipad.png – 323 x 156 (50%)
- fillip-iphone-retina.png – 303 x 146 (46.9%)
One of the nice things about using Image Sets is that you do not need to follow a specific naming convention for your image files. So in our code above we are loading an image named “Frog” but none of the actual images we are going to use have that name.
Create a new Image Set
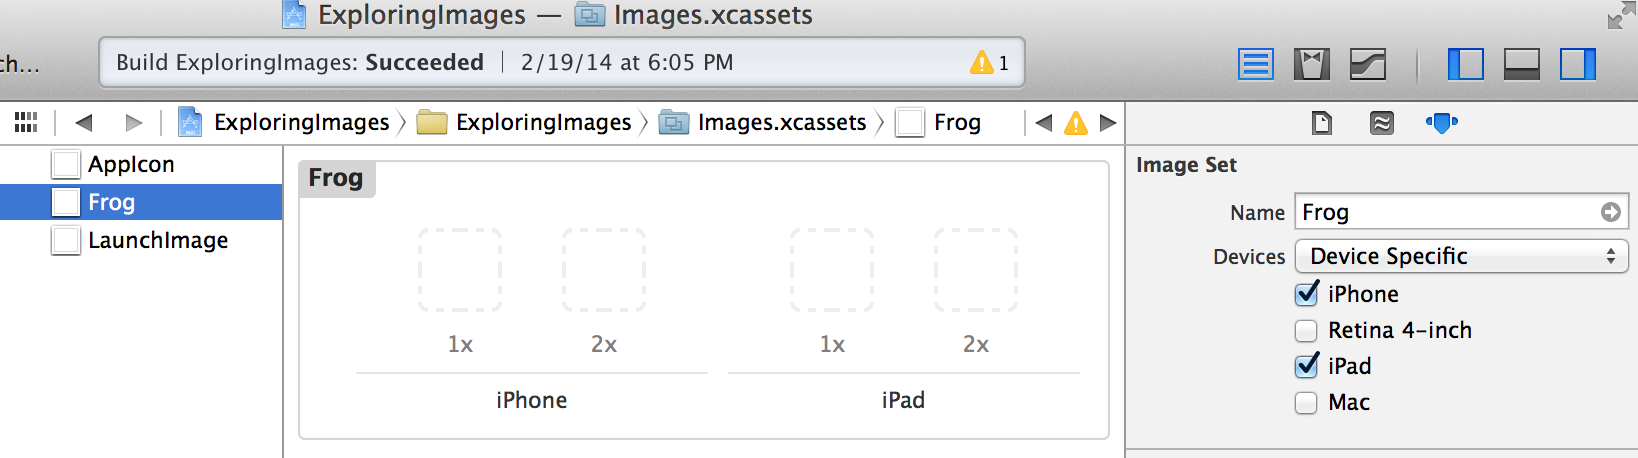
In your project select the Image Catalog. It is the folder named Images.xcassets in the explorer. You should already see that there is an item for the AppIcon and the LauchImage. Select the “+” button at the bottom of this list. This will present a contextual menu. Select the “New Image Set” item.

The new image set will be created with the default name of “image”. Select this item and then change the name to Frog. Additionally, change the devices popup from “Universal” to “Device Specific”. You will notice that in addition to the iPhone and iPad checkboxes there is also a checkbox for the iPhone Retina 4-inch. If you had a different image you wanted to use just for the 4-inch iPhone you could check this box as well.
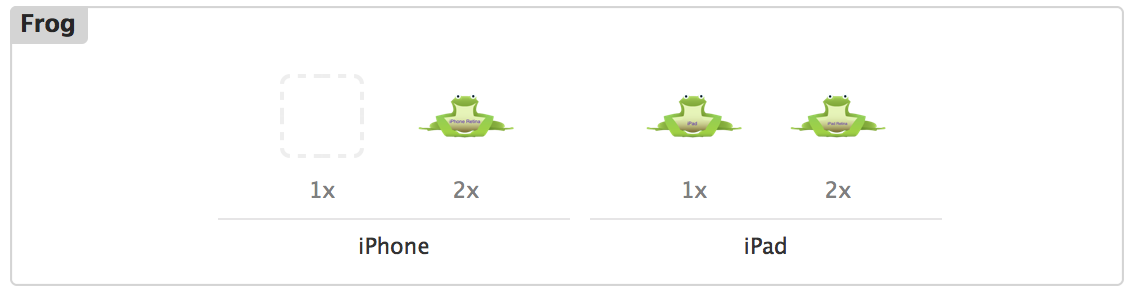
The next step is to add the images to the image set. To do this simply drag the images from the finder to the appropriate spot in the image set. Because we are using SpriteKit in this App, there is no need to add the non-retina iPhone images. SpriteKit requires iOS 7 which is not supported on the non-retina iPhone.
Now running the app on each of the simulators we should see the appropriate image for each of the different devices.
But, suppose that we actually want to use the same image for multiple devices. For example since the sizes are very similar we may want to use the same image for the the iPhone Retina and the iPad. To do this you could simply drag the image from the finder into the project a second time. This will create a second copy of the image in your project. But, there is also a manual process you can use to avoid having to bring in a second copy of the image. If you look at the “Frog.imageset” in finder you will see it is a folder that contains your images as well as a Contents.json file.

If you open the Contents.json and manually edit the iPhone 2X file name to be the same as that for the iPad 1X, you can then delete the iPhone Retina image from your project. Your app will then use the same image for both the iPad and the iPhone. This can help to reduce the overall size of your app.
In the next post we will look at setting up and using a Texture Atlas, which is the preferred method for working with images within SpriteKit.
Continue reading → - Working with Images in SpriteKit – Image Files
By: Mark Johnson @mellowcoder
The following is the first in a series of posts on working with images in SpriteKit. Specifically how to manage image files when developing a Universal App. This first post will be a general discussion of image sizes and look at the naming conventions that can be used when adding images directly to a project.
Before we get started we need to discuss screen sizes. SpriteKit requires iOS 7, so we do not need to support images for the non-retina iPhone. This means there are currently four screen sizes we will be working with.
- iPhone Retina (3.5 inch) – 960 x 640
- iPhone Retina (4 inch) – 1136 x 640
- iPad – 1024 x 768
- iPad Retina – 2048 x 1536
The approach we have taken when designing our images is to first create the highest resolution images for use with the iPad Retina and then scale down the images for the other devices. This means that the images for the iPad are simply scaled down by 50% from the retina size. Scaling down to the iPhone it is a little more complicated and depends on how the images are being used (characters or backgrounds) and the supported orientation (portrait or landscape) of the app. For most characters sprites we use the same size images that are used with the iPad. For other images it may be appropriate to scale them relative to scaling factor associated with the width or the height. The table below shows the potential scaling factors that could be used.

Once you have worked out the appropriate scaling factors to use, the next question is how to get the correct image for each device. When adding images directly into your project this can be done using Apples’s image file naming convention. The following is the naming convention for each of the different devices that support SpriteKit.
- iPhone Retina (3.5 inch)* – image_name@2x~iphone.png
- iPhone Retina (4 inch)* – image_name@2x~iphone.png
- iPad – 1024 x 768 – image_name~ipad.png
- iPad Retina – 2048 x 1536 – image_name@2x~ipad.png
* The ~iphone extension on the name is optional but, I find it helps to avoid confusion.
Then to load the images you simply use the base image name.
spSKSpriteNode *sprite = [SKSpriteNode spriteNodeWithImageNamed:@"image_name"];
Unfortunately, there isn’t a specific naming convention that can be used to automatically load a different image on the 4 inch iPhone. Additionally, when using the naming conventions there isn’t an easy way to share an image between devices. For example, if you wanted to use the same image for the iPhone and the iPad since there scaling is almost the same.
In the next post we will look how to work around these two issues using Image Sets.
Continue reading →